GDW · GDWH · dual wall
Dual wall tube: when the adhesive is the actual product
0.35 mm of hot melt at GDW 3/1, 0.9 mm at GDW 50/17. That column, not the wall column, sets the largest step the tube can close.
GDW dual wall tubing
Polyolefin co-extruded over a hot-melt adhesive lining. Nine codes at 3:1, from 3.0 mm supplied down to 1.0 mm recovered, and three more at 4:1. The outer layer insulates and takes the abrasion. The inner layer melts as the tube recovers and is squeezed into the steps the wall would otherwise bridge over. One heating therefore produces an insulation and a seal.
- Published as a permanent waterproof barrier over wire splices and harness connections
- Offered as an alternative to a moulded part or a cable breakout
- Resistance to weathering and UV rays
- Flammability pass to ASTM D2671; fungus inert to MIL-I-7444; copper corrosion good to ASTM D2671B
- RoHS and REACH compliance carried on the datasheet header
| Construction | Polyolefin co-extruded over hot-melt adhesive |
|---|---|
| Shrink ratio | 3:1 and 4:1, published as two separate charts |
| Supplied ID | 3.0 mm to 50.0 mm |
| Recovered ID | 1.0 mm to 17.0 mm |
| Recovered wall, adhesive included | 0.9 mm to 2.4 mm |
| Recovered adhesive layer | 0.35 mm to 0.9 mm |
| Operating temperature, outer wall | −55 to +125 °C, IEC 216 |
| Dielectric strength | >15 kV/mm, ASTM D2671 |
| Tensile strength | 9 N/mm² min, ASTM D638 |
| Ingress protection | IP 68 |
GDW selection chart, 3:1
| Part number / size | Supplied ID (mm) | Recovered ID (mm) | Recovered wall incl. adhesive (mm) | Recovered adhesive (mm) | Standard package |
|---|---|---|---|---|---|
| GDW 3/1 | 3.0 | 1.0 | 0.9 | 0.35 | 200 m/spool |
| GDW 6/2 | 6.0 | 2.0 | 1.1 | 0.4 | 50 m/spool |
| GDW 9/3 | 9.0 | 3.0 | 1.3 | 0.5 | 30 m/spool |
| GDW 12/4 | 12.0 | 4.0 | 1.5 | 0.6 | 30 m/spool |
| GDW 18/6 | 18.0 | 6.0 | 1.9 | 0.7 | 30 m/spool |
| GDW 24/8 | 24.0 | 8.0 | 2.2 | 0.8 | 25 m/spool |
| GDW 30/10 | 30.0 | 10.0 | 2.3 | 0.9 | 25 m/spool |
| GDW 39/13 | 39.0 | 13.0 | 2.4 | 0.9 | 25 m/spool |
| GDW 50/17 | 50.0 | 17.0 | 2.4 | 0.9 | 25 m/spool |
Reproduced from the manufacturer's dual wall tubing page. Two things the headings do not say. The wall figure already contains the adhesive, so the polyolefin left on a GDW 12/4 is 0.9 mm, not 1.5. And the datasheet legend reads d: Dia. as Free Recovered, T: Free Recovered Wall Thickness — both are measured with nothing inside the tube, so a part that lands on a substrate stops above the recovered ID printed here. Every series on one supplied-against-recovered axis is on the heat shrink size chart.
GDW selection chart, 4:1
| Part number / size | Supplied ID (mm) | Recovered ID (mm) | Recovered wall incl. adhesive (mm) | Recovered adhesive (mm) | Standard package |
|---|---|---|---|---|---|
| GDW 8/2 | 8.0 | 2.0 | 1.2 | 0.4 | 50 m/spool |
| GDW 12/3 | 12.0 | 3.0 | 1.5 | 0.6 | 30 m/spool |
| GDW 16/4 | 16.0 | 4.0 | 1.8 | 0.6 | 30 m/spool |
Three codes, and the supplied range ends at 16.0 mm. Over anything larger the 3:1 chart is the whole offer in this material, and a wider window comes from the 5:1 tube or from a moulded part.
Read the adhesive column before the wall column
The adhesive layer sets the largest step the part can close. GDW 3/1 carries 0.35 mm of it and GDW 50/17 carries 0.9 mm: across the chart the diameter grows more than sixteenfold and the adhesive less than threefold. A crimp shoulder, a taped ridge or the mouth of a lug barrel deeper than that layer stays open under a tube whose wall figure looks generous.
Two rows start from the same diameter and land in different places. GDW 12/4 and GDW 12/3 are both supplied at 12.0 mm, both recover to a 1.5 mm wall, both carry 0.6 mm of adhesive. One stops at 4.0 mm, the other pulls down to 3.0 mm. The leading number does not tell you which one fits.
So two measurements fix the size, not one. Recovered ID goes under the smallest diameter in the run, supplied ID clears the largest. On a splice that is usually the bare conductor at one end and the crimp barrel in the middle. That window is all a shrink ratio describes.
The same part number, two manufacturer charts
Recovered wall including adhesive, then the adhesive layer alone. On the left, the chart on the manufacturer's current dual wall page. On the right, the GDW section of an older thin-wall brochure, linked below.
| Part | Current dual wall chart | Pre-2020 thin-wall brochure |
|---|---|---|
| GDW 3/1 | 0.9 / 0.35 mm | 1.0 / 0.4 mm |
| GDW 4.8/1.6 | not listed | 1.0 / 0.5 mm |
| GDW 6/2 | 1.1 / 0.4 mm | 1.1 / 0.5 mm |
| GDW 9/3 | 1.3 / 0.5 mm | 1.3 / 0.6 mm |
| GDW 12/4 | 1.5 / 0.6 mm | 1.5 / 0.7 mm |
| GDW 18/6 | 1.9 / 0.7 mm | 2.0 / 0.8 mm |
| GDW 24/8 | 2.2 / 0.8 mm | 2.3 / 0.9 mm |
| GDW 30/10 | 2.3 / 0.9 mm | not listed |
| GDW 39/13 | 2.4 / 0.9 mm | 2.5 / 1.0 mm |
| GDW 50/17 | 2.4 / 0.9 mm | 2.5 / 1.2 mm |
| GDW 75/25 | not listed | 2.5 / 1.2 mm |
| GDW 100/34 | not listed | 2.5 / 1.2 mm |
Two GDW charts are in circulation and they disagree
The second chart is the GDW section of Heat Shrink Thin Wall Tubes, and its own footer dates it: the Charkop, Kandivli address the company left for Eureka Tower in January 2020, under ISO 14001 and OHSAS 18001 rather than the current ISO 45001:2018. It runs 3:1 only and out to GDW 100/34, which is where the GDW 6/2 to GDW 100/34 range on one of the manufacturer's own product pages comes from. Its adhesive figures are 0.05 to 0.3 mm thicker on every shared row, its tensile strength 12 N/mm² against 9, and its specifications line omits UL 224. It also contradicts itself: the bullets give −55 to +85 °C, the table on the same page −55 to +125 °C. Quote the row and the sheet, not just the part number.
GDWH: the same idea sized to a harness splice
Five sizes, GDWH-1 to GDWH-5, all at 4:1, with a minimum published length of 50 to 75 mm depending on size. The mechanism is published plainly: on heating the hot melt is squeezed around the crimped or welded connection, blocking the path moisture takes between the wires.
The grade is not GDW re-badged. Dielectric strength is published above 20 kV/mm against 15, tensile strength at 16 N/mm² minimum against 9, and the construction is called flame retardant. The thermal line is the same, −55 to +125 °C to IEC 216.
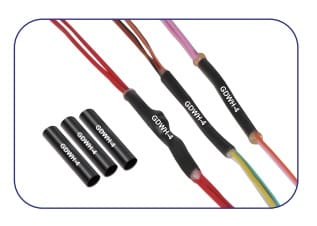
GDWH harness range
| Part no / size | D (min) | d (AL) | d (J) (max) | Recovered wall (min) | Unlabelled column | Length L (min), mm |
|---|---|---|---|---|---|---|
| GDWH-1 | 5.75 | 1.25 | 2.65 | 0.60 | 0.60 | 50 |
| GDWH-2 | 7.50 | 1.65 | 3.45 | 0.70 | 1.40 | 50 |
| GDWH-3 | 11.00 | 2.40 | 4.65 | 0.80 | 1.80 | 65 |
| GDWH-4 | 14.00 | 3.00 | 5.90 | 0.90 | 2.15 | 65 |
| GDWH-5 | 18.30 | 4.35 | 7.40 | 0.90 | 2.20 | 75 |
Copied from the manufacturer's wire harness tube page. The published header row carries six labels and a blank seventh cell against seven columns of figures. The length label is read onto the last column here, because 50 to 75 cannot be a wall thickness and 0.60 cannot be a length in millimetres; the sixth is left unlabelled rather than guessed at. Only that length column is given a unit — the diameters and walls carry none. Where GDWH sits among the other four harness jobs is on wire harness tube.
Not published: what AL and J mean, or what the seventh column measures
The chart gives two diameters per size, d (AL) and d (J), and expands neither abbreviation anywhere on the page. GDWH appears in none of the manufacturer's downloadable datasheets, so there is no second document to resolve it against. Two questions before ordering to this chart. Which of the two diameters must the splice pass through, and is the unlabelled column the adhesive layer, as it is on the GDW sheet?
Recovery finishes first, the seal finishes second
No GDW installation sheet is published. Steps two and three below are bench practice, not manufacturer text, and printed kit instructions override them. Every figure quoted is from the datasheet.
Fix the size on two diameters
The manufacturer's own selection rule is to pick a tube that recovers slightly smaller than the part it goes on. A 12.0 mm supplied code gives a window of 12.0 down to 4.0 mm at 3:1, or 12.0 down to 3.0 mm at 4:1 — and the recovered figure is a free-recovery figure, so on a substrate the tube grips before it reaches it.
Clean back further than the tube reaches
Wipe the jacket each side past the point the cut length will land. Hot melt bonds to what it wets, and it does not wet oil, release agent or dust.
Heat from the middle outwards, one end then the other
Air ahead of the recovery leaves through an open end instead of setting as a void under the wall. Keep the flame moving in circular passes: the outer wall is rated to +125 °C in service, and a stalled torch scorches it long before the layer underneath has flowed.
Read the bead, not the profile
A continuous ring of melted adhesive standing proud at both ends is the only visible proof the inner layer moved. A tube that has gripped the substrate with no bead showing has recovered and not sealed — and it looks finished. That failure is one of the five on why a recovered tube fails.
Above GDW 50/17 the adhesive changes series
The current GDW chart stops at 50.0 mm supplied. The adhesive continues in the medium and heavy wall grades: GMWR runs 12/3 to 130/36 with recovered walls of 1.5 to 3.0 mm, GHWR 12/3 to 140/42 at 2.2 to 4.2 mm, both to IEC 60684-3-247 under Technical Qualification Report QR 1014. They are sold for cable terminations and joints, pipe connections, and underground and aerial CATV plant — not for wire splices.
On the plain GMW and GHW sheet the hot melt is an option instead of part of the extrusion, and the IP 68 claim there is written as conditional on taking it. Ordering that series without the adhesive is ordering a tube that insulates and does not seal. Both charts, the wall grades and the voltage lines are on medium and heavy wall tubing.
Next
- Heat shrink tubing indexEvery wall grade and ratio, with the series this one competes with
- Heat shrink size chartGDW beside the single-wall series on one axis
- Wire harness tubeGDWH among bundling, abrasion, strain relief and marking
- Medium and heavy wall tubingGMW and GHW, where the adhesive becomes an option
- Shrink ratio explainedWhat the second number in 12/4 and 12/3 promises
- Why a recovered tube failsAdhesive that never flowed, and the four other faults
Send two diameters and a step depth
The smallest diameter the tube must close onto, the largest it must pass over, the deepest step between them, and what the adhesive has to bond to. Four numbers fix a GDW or GDWH size in one reply instead of four.